
Hi everyone, I'm Nitin Gavhane, and in this blog I'm going to walk you through exactly how to use Claude Code for free — no GPU, no Ollama, no Nvidia account, no region restrictions. Just an API key and a few terminal commands.
Why the Popular Free Methods Don't Actually Work
Most developers who go searching for a free Claude Code setup end up trying two things: Nvidia NIM or Ollama. Both frustrate you for different reasons.
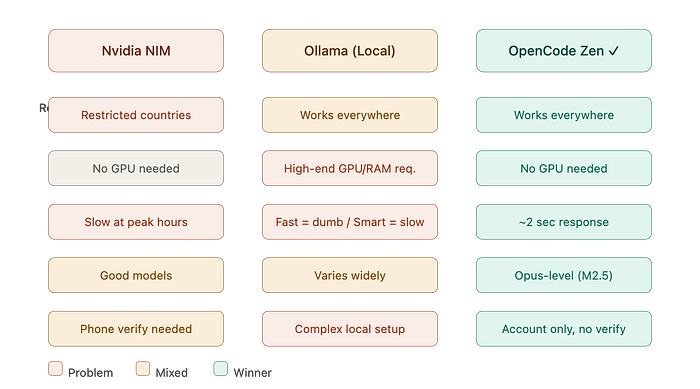
Nvidia NIM has region restrictions — a lot of developers in India and other parts of the world simply can't verify an account. Even if you get in, the API slows to a crawl after 6 PM in India because everyone is hitting it at the same time. And the errors. So many random errors.
Ollama is a different kind of painful. It runs models locally, which sounds great until you realize you need serious hardware. Even on a Mac with 64GB RAM and an M5 Pro chip — something that costs around ₹4 lakh — the experience is rough. The fast models aren't smart enough for real coding work. The smart models are so slow they're practically unusable. Local AI coding is genuinely promising, but it's just not ready for most people's machines yet.
What Actually Works: OpenCode Zen + Minimax M2.5
The setup that works is this: you point Claude Code at OpenCode Zen as the API provider, and use their Minimax M2.5 free tier as the model.
No GPU. No local setup. No phone verification. No region lock. The model runs in the cloud, so your hardware literally doesn't matter.
One thing worth knowing upfront — the Minimax M2.5 free tier is available through OpenCode Zen for an unannounced duration. There's no official end date. Could be a month, could be longer. Use it while it's there.
Is Minimax M2.5 Good Enough for Real Work?
This is the first thing most people ask. And honestly, the answer surprised me.
Minimax M2.5 benchmarks at Opus level. That puts it in the same range as Claude Opus 4.6 — not just Sonnet. You can verify this yourself by searching "Minimax M2.5 vs Claude Opus benchmark."
For context: most Claude Code Pro subscribers mostly use Sonnet anyway, because Opus burns through your quota after roughly four messages. These open-source models sitting at the Sonnet-to-Opus range means you can actually work on large, complex codebases without hitting a wall every ten minutes.
It's not a toy model. It handles production-level work.
How to Set It Up (Mac and Linux)
Here's what the full setup looks like, then I'll walk through each step.
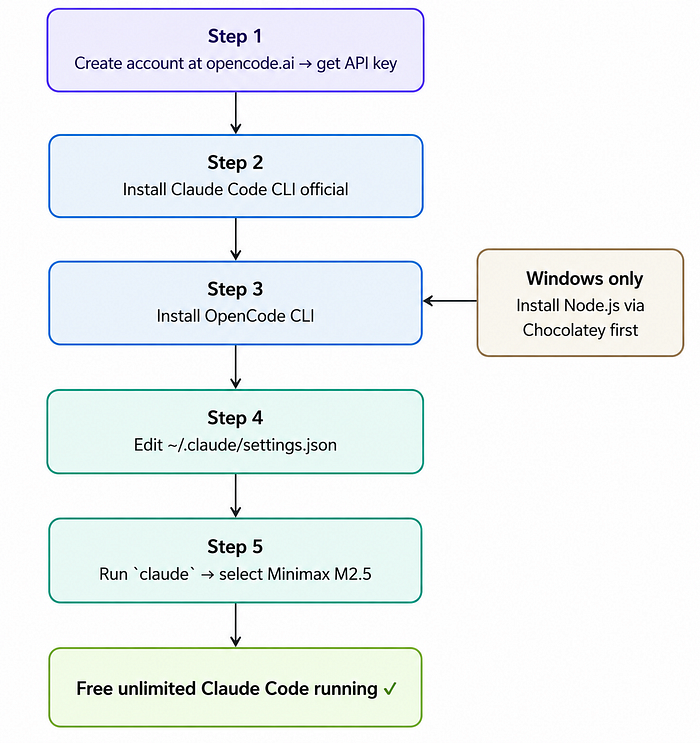
Step 1 — Get your free API key from OpenCode Zen
Go to opencode.ai, click on Zen in the navigation, log in or create an account. Don't enable billing — you only want the free models. Go to API Keys, create one, give it a name, and copy it somewhere safe.
Step 2 — Install Claude Code CLI
Even if you only want Claude Code inside VS Code, you still need the CLI installed first. The VS Code extension depends on it. Grab the install command from claude.com/product/claude-code and run it in your terminal. Type claude --help to verify it worked.
Step 3 — Install OpenCode
Go to opencode.ai and copy the install command from the homepage. Paste it into your terminal. Restart your terminal after it finishes.
Step 4 — Edit your settings.json
In your terminal, type code ~/.claude to open the Claude config folder in VS Code. Create a settings.json file if it doesn't exist. Paste in this configuration:
{
  "env": {
    "ANTHROPIC_BASE_URL": "https://opencode.ai/zen",
    "ANTHROPIC_MODEL": "minimax-m2.5-free",
    "ANTHROPIC_API_KEY": "your-zen-api-key-here",
    "ENABLE_TOOL_SEARCH": "true"
  }
}
Replace the placeholder with your actual API key. If you already have a settings.json with other config in it, only add the "env" block — don't paste over and wipe what's already there.
Step 5 — Run Claude Code and select the model
Type claude in your terminal. Choose your theme. Claude Code will detect your custom API config and ask if you want to use it — select Yes. Then type /model and select Minimax M2.5 Free from the list.
Type hey to test it. The response speed is noticeably fast.
Windows Setup — One Extra Step
Windows users need Node.js installed before OpenCode will work. The easiest path is through Chocolatey.
Open PowerShell as administrator, go to chocolatey.org/install, copy the install command, and run it. Once Chocolatey is installed, use it to install Node.js. Close and reopen PowerShell (regular window this time, not admin), then verify with node -v.
After that, run npm install -g opencode-ai, and the rest of the steps are the same as Mac.
For the settings.json on Windows, navigate to C:\Users\YourUsername\.claude\ in File Explorer. The file structure and config content are identical.
Running It Inside VS Code
If you prefer working inside VS Code rather than the terminal, the setup is simple.
Open the Extensions tab (Cmd+Shift+X on Mac, Ctrl+Shift+X on Windows), search for "Claude Code," and install the official Anthropic extension — it has a verified tick. Open any project folder, click the Claude Code icon in the sidebar, click New Session, type /model, and select Minimax M2.5.
That's it. Everything runs through the same API configuration you set up in settings.json.
The $20/month Claude Pro subscription is worth it if you're a heavy user. But for a lot of developers — students, indie builders, people just starting out with AI coding tools — the cost is a real barrier. This setup removes that barrier completely, at least for now. The model quality is there. The speed is there. The only thing missing is the bill at the end of the month.